
Exadata’s transition from ASM to the new Exascale storage architecture has introduced powerful cloning capabilities at both the volume and database levels. In this article, I will break down the difference between Exascale Volume Snapshots (thin clones at the block storage level) and PDB Snapshot Clones (thin clones at the pluggable database level). We’ll explore how these concepts evolved with Exascale, and when to use one approach over the other in real world scenarios. We will also revisit ASM volumenes and ACFS, discuss what changes with Exascale, and show a simple example of creating and mounting a volume with ACFS. Let’s dive in!
ASM Volumes and ACFS Before Exascale
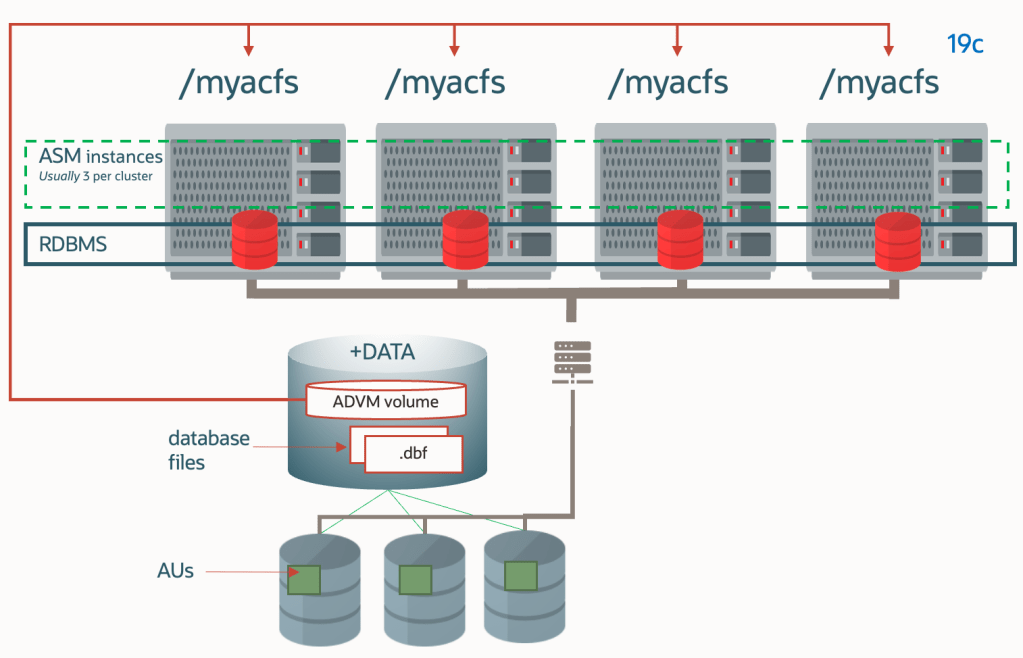
To understand the new Exascale features, it helps to start with the basics of ASM and ACFS. An ASM volume is a logical block device provided by Oracle ASM’s Dynamic Volume Manager (ADVM). In Oracle 11g and later, you could “carve out” a volume from an ASM disk group using asmcmd volcreate, which creates a device file (for example, /dev/asm/volume1-123) that the OS sees as a regular disk. This volume can then be formatted with a file system – typically Oracle ACFS – and mounted for use by the operating system.
We can use ACFS to store all kinds of files: application binaries, logs, backups, configuration files, etc., and it supports advanced features like snapshots, encryption, compression, and replication. In a RAC environment, an ACFS file system on an ASM volume can be mounted on multiple nodes, providing a shared file system accessible across the cluster.
Typical use cases for ASM Volumes + ACFS : Before Exascale, ASM volumes with ACFS were used in a couple of key ways in Exadata environments::
- Shared File Systems for Files: ACFS provided a shared file system for things like application data (e.g. invoices, images, configuration repositories, etc) and database-related files that aren’t stored in ASM. ACFS could even be exported via NFS for external access. It was a flexible a convenient way to have a good self-hosted performance shared mount point in a RAC.
- Snapshot Clones of Databases: As I thoroughly reviewed in my previous posts, ACFS’s snapshot capability was leveraged to implement thin cloning of pluggable databases (PDBs) (along with sparse DGs). The database would rely on ACFS copy-on-write snapshots “under the covers” for these thin clones. In practice, ACFS was doing the heavy lifting for snapshot clones. This approach worked, but databases on ACFS could not use Exadata’s Smart Scan offloading, and performance could degrade with multiple snapshot iterations.
So ASM+ACFS gave us volumes that behaved like regular disks, and ACFS brought advanced file system capabilities including snapshots. However, as environments grew and multitenant (PDB) cloning became common, some limitations of this approach became evident. That’s where Exascale comes in.
Exascale Volumes and ACFS: What Changes with Exascale?
Exascale now introduces the concept of an Exascale Pool, Vault and Exascale Files within that vault. But for this article, the most important piece is the Exascale Direct Volume (EDV).
Exascale Direct Volume (EDV) is the modern equivalent of an ASM volume. An EDV is essentially a file in the Exascale storage pool (vault) that is presented to a host as a block device via a high-speed RDMA-enabled protocol. This device can then be formatted with ACFS and mounted, just like before. The big difference is that the volume is backed by Exascale’s storage engine, giving it all the performance, security, and thin provisioning benefits of Exascale.
Both ACFS and Exascale support the idea of thin clones, but they operate at different layers and have different scope and management tools. It’s crucial to understand these differences:
- ACFS Snapshots: ACFS snapshots work at the filesystem level. When you create an ACFS snapshot, you are effectively freezing the state of the entire file system (or even just specific files, in the case of ACFS fshares) at a point in time. ACFS uses a copy-on-write (redirect-on-write) mechanism so that changes after the snapshot don’t overwrite the original data – new changes go to new blocks, preserving snapshot state. ACFS snapshots can be read-only or read-write. You manage ACFS snapshots using the acfsutil command (e.g., acfsutil snap create for a file system snapshot, or acfsutil fshare create for a single-file snapshot).
- Exascale Volume Snapshots: Exascale volume snapshots operate at the block volume level. Instead of creating a file system snapshot, these snapshots clone the entire volume (all data blocks on it) in a thin-provisioned manner. An Exascale volume snapshot results in a new volume that is a point-in-time copy of the original, but it consumes virtually no additional space until changes are made (thanks to redirect-on-write at the storage layer). These can also be read-only or promoted to read-write clones. You manage Exascale volume snapshots either via ACFS tools (if the volume is mounted and in use by ACFS) or via Exascale tools (escli) when the volume is not mounted.
The visibility and scope of these snapshots differ significantly:
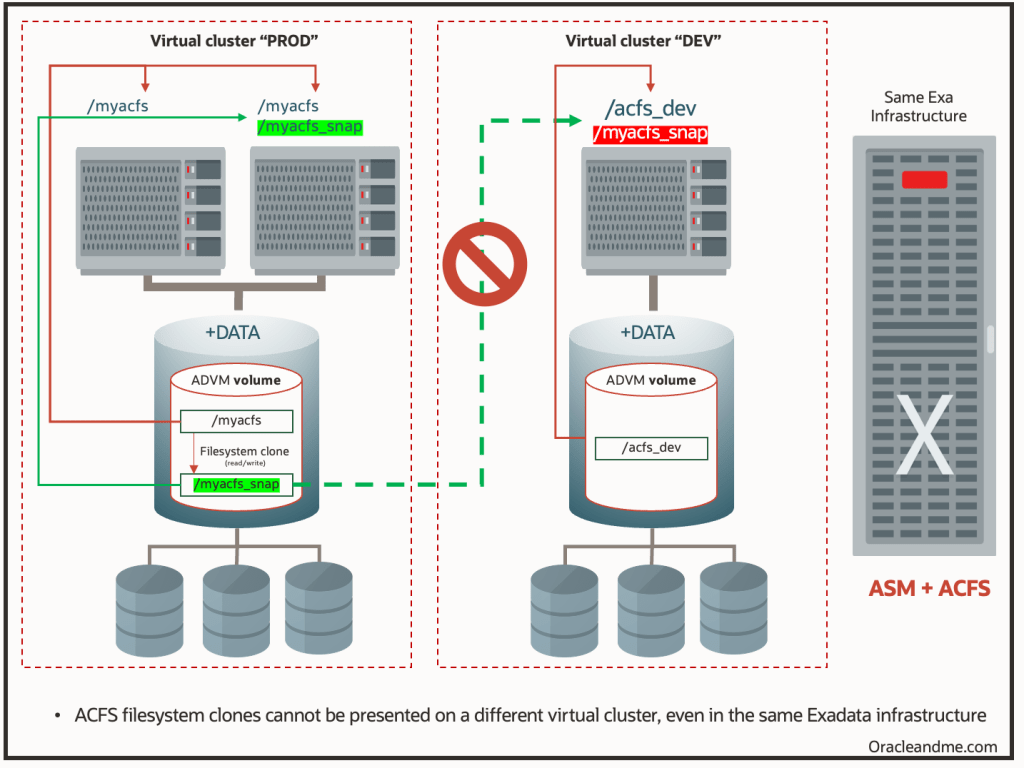
- ACFS Snapshots are Local: An ACFS snapshot is only visible within the file system where it was taken. If you snapshot an ACFS file system mounted at /myacfs, that snapshot (often accessible under a .ACFS/snaps directory or similar) is only usable from within /myacfs on that volume. You cannot detach an ACFS snapshot and attach it elsewhere. In fact, to use that snapshot on another system or cluster, you’d have to copy the entire volume or have the same volume mounted there. I will try to showcase this situation better with the following diagram:
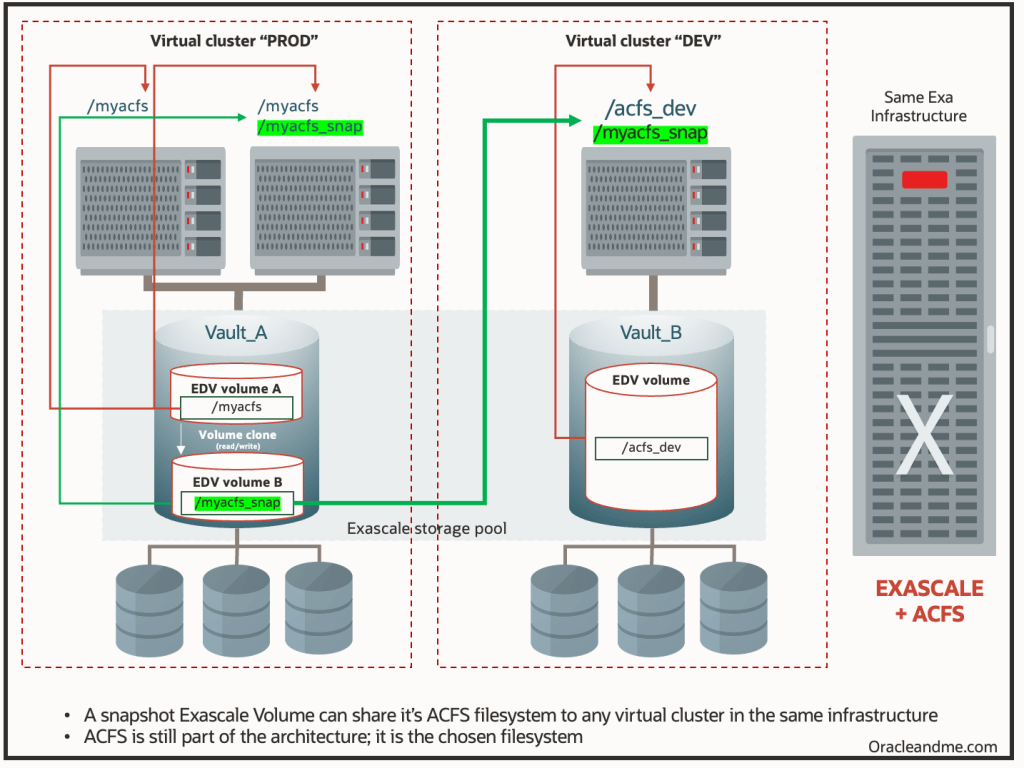
- Exascale Volume Snapshots are Infrastructure-wide: When you create a snapshot of an Exascale volume, you are actually getting a new volume in the Exascale storage pool. This snapshot (especially if you convert it to a read-write clone) can be attached to a different VM or even a different cluster (as long as it has access to the same Exascale vault) just like any other volume. For example, you might snapshot a volume hosting /myacfs on a prod cluster, then attach the snapshot as a device on a dev/test cluster and mount it there. This is a game changer; it means you can clone entire filesystems and share them across environments without physically copying data. The Exascale snapshot exists independently in the storage pool and can be treated as a new volume. (By contrast, an ACFS snapshot lives inside the original volume and can’t be pulled out on its own). Using the same example:
Real-World Use Cases: When to Use Exascale Volume Snapshots
These are just some use cases I believe the volume snapshots might help with:
- Cloning an Entire Filesystem with Shared Business Content: Imagine you have a shared ACFS file system that contains database related business files – for example, a repository of invoice PDFs, images, or configuration files that your applications use alongside the database. If you want to create a full test environment that mirrors production, cloning just the PDB isn’t enough; you need all those external files too. An Exascale volume thin clone is ideal here: you can take a snapshot of the volume hosting the ACFS filesystem, and attach that snapshot volume to a test VM cluster. Within minutes your test environment has an exact, point-in-time copy of all the data without consuming additional space for duplicates. The test team can work with real data (being a read-write snapshot, subsetting the data or even datamasking is possible), and none of it impacts production. When done, you simply detach and discard the snapshot clone.
- Creating Gold Images for Multiple VM Clusters: In some cases, you might maintain a “golden” image of software or configuration on a volume, which you want to reuse across many environments. For example, say you’ve installed and configured a particular application on an ACFS volume. By taking an Exascale volume snapshot of this “gold image” volume, you can clone it and attach the clone to other VM clusters instantly. Each clone is a thin-provisioned copy of the master image. This is extremely useful for provisioning new environments: instead of installing software repeatedly, you prepare one master and then create clones for each new VM cluster or node. The clones will boot or run from the same underlying data until changes are made, and each environment can customize its own clone (since you can make the snapshot read-write).
- Cross-Cluster Data Distribution: In a production scenario, you might generate an export datapump or a backup on one cluster that needs to be accessed from another cluster (without needing to share it via NFS or even transferring it). By snapshotting the volume containing that data and attaching the clone to the other cluster, you achieve near-instant data distribution. And the IO will be light years better than NFS; you are actually restoring from the infrastructure pool.
- Backup and Recovery Strategies: Exascale volume snapshots can serve as an efficient backup mechanism. Taking a read-only snapshot of a volume essentially freezes the data at that point in time (similar to a backup) without actually copying it. You could keep a few snapshot generations as quick recovery points. If you need to a filesystem to a previous point in time, you can either use the snapshot directly (attach it and use the data) or promote it to replace the original. .
Easy adaptation
The process of creating a EDV is quite similar as before with ACFS. This is how it was done with ASM+ACFS:
#Create a 100 GB ASM volume in diskgroup DATA
asmcmd volcreate -G DATA -s 100G vol_app

#Check volume info (to get device path, e.g. /dev/asm/vol_app-123)
asmcmd volinfo -G DATA vol_app

#Format it with ACFS
/sbin/mkfs -t acfs /dev/asm/vol_app-123

#Create a mount point and mount the ACFS file system
mkdir -p /acfs/app
mount -t acfs /dev/asm/vol_app-123 /acfs/app
This is how it’s done with EDV+ACFS:
# Create a 2 TB Exascale volume named prod-vol
escli mkvolume --name prod-vol --size 2TB

# Verify device appears (e.g., /dev/edv/prod-vol or /dev/exc/prod-vol)
ls /dev/edv/prod-vol

# Format the volume with ACFS
/sbin/mkfs -t acfs /dev/edv/prod-vol

# Mount it at a desired mount point
mkdir -p /acfs/prod
mount -t acfs /dev/edv/prod-vol /acfs/prod
(Im explicitly ommiting the registration of the ACFS file system with clusterware for automatic mount for simplicity)
As you can see, creating and using a volume with ACFS remains simple, just with different tools. Now, lets see how we could create a snapshot from that volume mounted on /acfs/prod.
1.- We can create a volume snapshot using ACFS utilities since the volume is mounted (acfs will freeze the fs for 1 or 2 seconds for consistency ando coordinate with exascale to perform the action). The following command creates a snapshot named prod_vol_snap1. Under the covers, Exascale will create a point-in-time copy of prod-vol. If it’s a read-only snapshot by default, we could specify -w for a writable clone.
acfsutil volsnap create prod_vol_snap1 /acfs/prod
2.- Now the new snapshot exists as an Exascale volume in the storage pool. We could see it as a device like /dev/edv/prod_vol_snap1 (the exact naming might have a timestamp or ID). Using Exascale’s CLI (say this is a onprem exadata virtual cluster), we can attach this snapshot volume to a target VM or cluster. For example:
escli attachvolume --name prod_vol_snap1 --targetcluster dev-cluster
3.- On the target dev/test machine, the device will show up (after attachment). We then simply mount it:
mkdir -p /acfs/prod_clone
mount -t acfs /dev/edv/prod_vol_snap1 /acfs/prod_clone
Now /acfs/prod_clone is an exact copy of what /acfs/prod had at the snapshot moment. The dev team can read/write here (if it’s a writable clone) independently of the prod system.
4.- After testing, we can unmount and detach the volume from the dev side, and then remove the snapshot with “acfsutil volsnap delete” . The snapshot being thin-provisioned meant we only used extra space for whatever changes were made in the dev environment.
Note: In Exadata cloud systems some of the steps will be done via console.
Wrapping up
Exascale has expanded our “toolkit” for cloning and snapshotting in Oracle environments. ASM volumes + ACFS gave us a solid foundation for shared file systems and introduced snapshot clones at the file system level (which were used for PDB snapshot clones as well – when created on top of ACFS). Exascale volumes + ACFS retain that functionality but add a new dimension: volume-level snapshots that are fast, space-efficient, and sharable across clusters. Meanwhile, Oracle Database on Exascale can do PDB snapshot clones natively, better than ever.
With Exascale, Oracle has blurred the line between database and storage management for cloning, giving the DBAs great power to cover their needs without needing external help. Happy cloning!
